The HUD System
HUD is child's play with VSLib. Let's quickly go over some examples.

Item Class
This is your generic class to display some text.
::example <- HUD.Item("You collected {num} gears out of {total}!");
example.SetValue("num", 11);
example.SetValue("total", 25);
example.AttachTo(HUD_TICKER);
The above should be self-explanatory. Note that SetValue can also take functions, strings, and floats as parameters (if you pass a function to it, it will call your function and use the return value). You just witnessed the SetValue and AttachTo functions, but there are many more functions available for the Item class (and thus every other HUD object, since all HUD objects derive from the Item class). Below is a link to the functions.

Click here for a list of HUD functions.

Countdown Class
Here's an example of using the Countdown class:
// Function to fire when the countdown is over
// Note the weird way in which we create this function
::CountDownIsDone <- function()
{
	Utils.SayToAll("Time's up folks!!");
}


// Create the countdown object
::test <- HUD.Countdown();

// Attach it somewhere and reposition and scale it
test.AttachTo(HUD_TICKER);
test.ChangeHUDNative(500, 53, 400, 77, 1280, 960); // pos = (500, 53), dimensions = 400 x 77, native res = 1280 x 960
test.CenterHorizontal();
test.Start(CountDownIsDone, 1, 30, 45); // start at 1 hr, 30 min, 45 sec

// And if we wanted to stop the timer... (Comment the code below if you're going to test.)
test.Stop();
Should be simple... I highly suggest that you experiment with these functions. If you're just reading this and not plugging in values and testing stuff out, you're never going to understand how to use these classes.
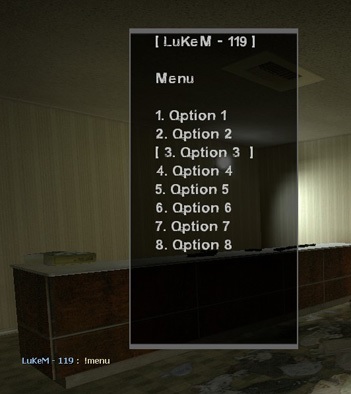
HUD Menu
HUD menus can hold a limited amount of text (beyond VSLib's control), so don't let your menu get too big or it will truncate characters. Right-click to scroll through menu, and left-click to select options.
// Test this out people!

::emptyfunc <- function (player, index, value)
{
	Utils.SayToAllDel("%s selected %d: %s", player.GetName(), index, value);
}

::testHUD <- HUD.Menu();
testHUD.AddOption("Option 1", emptyfunc);
testHUD.AddOption("Option 2", emptyfunc);
testHUD.AddOption("Option 3", emptyfunc);
testHUD.AddOption("Option 4", emptyfunc);
testHUD.AddOption("Option 5", emptyfunc);
testHUD.AddOption("Option 6", emptyfunc);
testHUD.AddOption("Option 7", emptyfunc);
testHUD.AddOption("Option 8", emptyfunc);

testHUD.DisplayMenu(player, HUD_MID_BOX);
AddOption() takes a function as you can see.


Progress Bars
Progress bars are pretty easy to use.
::progress <- VSLib.HUD.Bar();
progress.AttachTo(HUD_TICKER);
progress.SetBarValue(34);
Should be self-explanatory.


Continuous Progress Bars

Did you know that VSLib objects are pretty customizable? Here's how to create a continuous progress bar:
function ContinuousBar()
{
	const PERIOD = 2;
	const SCALE = 100;

	return sin(Time() * 2 * PI / PERIOD) * (SCALE / 2) + (SCALE / 2);
}

::progress <- VSLib.HUD.Bar( "Scanning... [{bar}]", 0, 100, 50, "(", ")" );
progress.AttachTo(HUD_TICKER);

progress.SetBarValue(ContinuousBar);
If you didn't know that VSLib objects can take various kinds of class constructor parameters, then you didn't open up HUD.nut at all! I honestly implore you to look through all the VSLib script files. There are dozens of undocumented functions that you would learn about if you actually looked through the code. Moreover, you will learn how VSLib is structured.